How to Make Handsaws
Words and photos: Ian Wilkie
A surprising number of decent old saws still circulate on the secondhand market, and usually a little bit of attention will bring them back to life. There are now also boutique sawmakers that offer a range of models to choose from, so why would anyone contemplate making their own?
For some of us, the challenge and satisfaction of making your own tools is enough, but a more practical reason perhaps, is that a saw you make yourself can be any size or shape you desire, and have the pitch and tooth profile suited to your particular requirements. And of course, making your own tools is a great way to learn about their basics and what it takes to get the best from them.
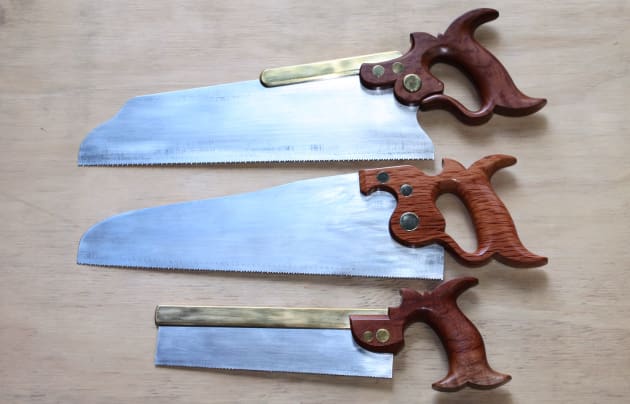
The total cost for materials for the three saws shown above site was about $50—a trifle compared with what you’d pay for equivalent custom-made examples. However, there are quite a few hours of work involved in each saw, and I won’t pretend I built a perfect one on my first attempt either. Making a very useable saw is not nearly as difficult as you may think, and requires no special equipment.
The top saw is my version of a saw the Disston company made from about 1850 to 1920, and known as the D8 ‘half-back’. I made it originally because I thought it looked interesting, and because a saw of that size would be useful to me. Now I have it I don’t know how I ever coped without it! The size and tooth pattern (10 tpi crosscut) make it ideal for general sawing tasks, and the handle position and angle suits use at bench-top level.
The middle saw is a 10tpi rip saw. This saw came about because I found the first saw such a handy size and weight that I was using it for all sorts of tasks, including light ripping, for which the crosscut teeth are not particularly suited. The half spine was sometimes a bit of a nuisance when ripping, so I decided a small ripsaw would be handy. The grip is more vertical with respect to the tooth line, and placed lower on the saw. This puts the effort of the cutting stroke (called the ‘thrust line’ by some) closer in line with the teeth, making it a little more efficient.
The smallest saw has a 225mm long blade and is designed spe- cifically for cutting dovetails and small tenon cheeks. The blade is very thin plate (0.4mm), the brass spine is relatively light at 5mm thick x 19mm wide, and the handle is pared down. It is almost a delicate saw but cuts like a hot knife through butter because of the thin blade, the light set and the rake angle of the teeth, which at 15.5 tpi are on the coarse side for a small saw.
Obtaining the materials
The easiest solution is to buy a basic kit of the hardware, and there are a few good ones available at reasonable prices. Starting with a kit is a good way to gain confidence, and end up with a very good saw. At least one supplier will sell you the necessary bits at various levels of completion, so you can avoid the processes that might worry you most, such as toothing, setting, and sharpening. You can still specify the tooth profile and tpi, and you do get to make your own handle, so it would still be a personalised tool.
The blade
There are many sources of steel suitable for use as saw plate. One source is the throw-away hard-point saws. After those glass-hard teeth become dull, they are usually con- signed to landfill, but you can easily cut off the impulse- hardened section a couple of millimetres above the tooth gullets, and the rest of the plate is workable spring steel. Another source is the builders’ floor scraper blades sold by large hardware chains. These are 0.8mm thick, a good thickness for larger backsaws or small saws without spines.
The hardness of these blades is around Rockwell 52, which is at the harder end of the desirable range for saws, and still quite workable. Yet another source is 1095 spring-steel shim stock, which can be bought in small sheets from various US suppliers. The steel itself isn’t expensive, but postage is.
Cutting the blade
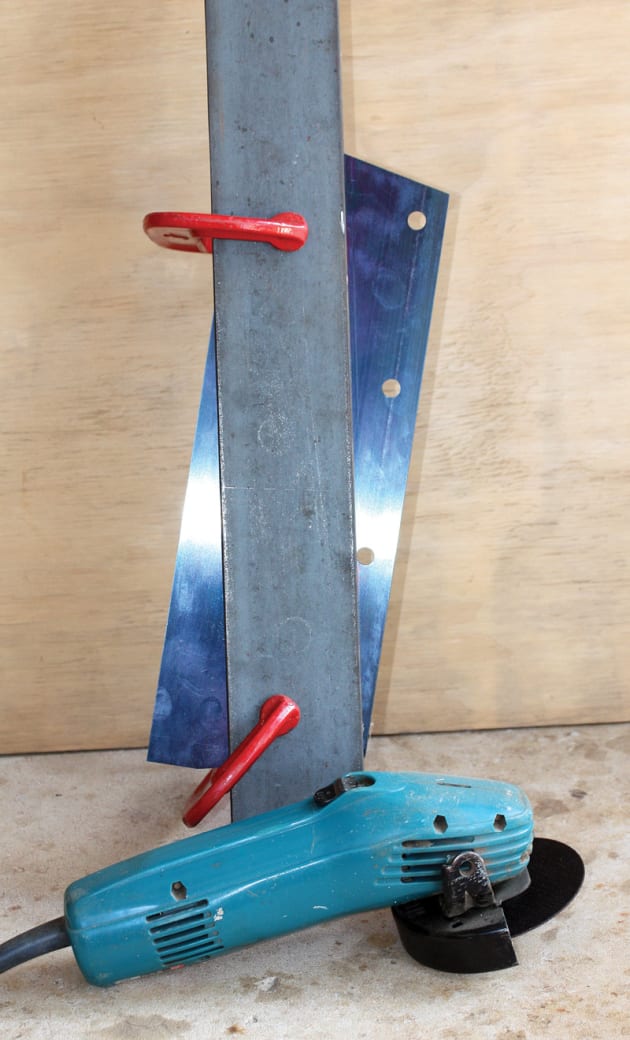
Cutting thin plate is not difficult (photo 2). Clamp the ‘good’ side of your saw blank between two pieces of steel at least 3mm thick, and use a 1mm metal-cutting wheel in an angle grinder. The thicker steel acts as a heat-sink to protect the saw plate, as well as a guide to keep the cutting wheel straight. In fact these wheels cut so quickly that there is very little danger of overheating and tempering the steel.
Cutting the straight lines for backed saws presents no problems, but what if you want to make curved shapes for small saws without spines? You can cut a broad curve freehand if you are careful, but it’s too easy to slip and damage the plate, so I prefer to cut as close as I can with a series of straight cuts, then fair the curves on a grinder. Use a light touch and smooth passes on a clean wheel and you won’t cause any damage by over-heating. Fine-tuning of shapes is best done with files, and final clean-up and polishing with sandpaper. You can polish to as high a shine as you like, but 1200 grit puts more than enough shine on for me.
Cutting the teeth
This step may have you very concerned, but it is actually much easier than you expect. You can duck the issue, as I did for my first saw, and take it to a saw sharpening place to have teeth cut, set and sharpened, but it’s not necessar- ily the best solution. For one thing, they may not be able to cut a high number of tpi (the place I went to can cut 15tpi max). Worse, they often know very little about hand saws, particularly the difference between crosscut and rip tooth profiles, so the rake you’ll get on your teeth is anyone’s guess. Besides, much of the value in a project like this is learning about saw teeth and how to maintain them, so forming a set of teeth is well worth the effort.
The easiest way of all is to use an existing set of teeth of the spacing (pitch) you require as a template. Clamp the blank and template so the top of your blank just shows behind the template. Now, take a fine three-cornered file, place it lightly against the back of each tooth (or front, doesn’t matter which, but be consistent) and make a small notch in the blank (photo 3). If you are careful to apply pressure only on the blank, you should not damage the template. You can also get paper templates from the internet, or make your own with a ruler and pencil. If you decide on a paper template, use glue that is not water-based (rust!), something like shellac does the job.
Once the blank is notched, the teeth are formed by filing each ‘valley’ (‘gullet’ is the proper term) to depth.
We need to discuss saw geometry at this point. The leading edge of each tooth of a hand saw actually leans away from the direction of the cut a little (which is called ‘negative rake’). The closer the edge is to perpendicular, the more aggressively the saw cuts. You may think that’s desirable, but it also gives the saw a rougher action, especially in hardwood, so a little negative rake is required on most saws. Western saws also come in two main flavours; one is meant for rip cuts (along the grain) and the other for cross cuts (across the grain). All you need to know at this point is that the rake varies for each type, and the amount adopted is usually in the range of 5–10° for a ripsaw, and 8–15° for a crosscut.
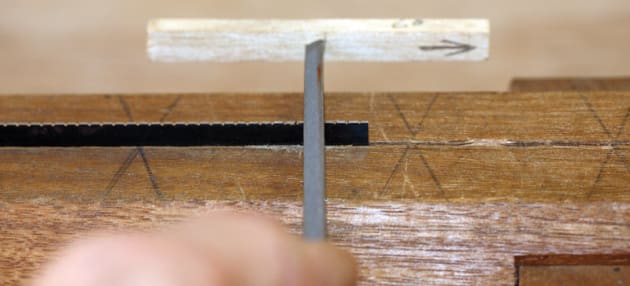
So how do you file a set of teeth and keep the rake consistent? It’s quite easy—just drill a small hole in a short piece of wood and draw a line at the angle you need beside it. Jam the file into the hole, with one side lined up against your line.
By keeping the stick horizontal as you work, the file will always be at the correct angle (photo 4). Make each stroke firm, but not heavy, and don’t try to cut too much at once, just make a couple of strokes at each notch.
It takes fewer strokes than you may expect to form a tooth. Watch the ‘flats’ between the gullets and judge if you need to apply a little more pressure on any shallow gullets. It helps to check the teeth from the side as well. As soon as all the flats have turned into points, you are done. Photo 5 above shows the toothed blade ready to drill and mount in its handle. It took six firm file strokes to form each tooth, and less than 20 minutes for the entire job.
The spine
The metal spine stiffens the blade and gives it balance. Folded steel or brass backs are the most common type on old saws, but folding metal around 3mm thick isn’t easy to do accurately unless you have access to a folder, and even then obtaining soft brass that will fold without breaking is very difficult. The easiest and most accurate way for the backyard sawmaker to obtain a spine is to slot a piece of brass bar.
Brass bar is readily obtainable in suitable sizes, and since it is easily worked, and adds a bit of bling to your saw, it’s a good choice. Most people find 10" x 3" bar to be sufficiently rigid and weighty for blades up to around 300mm long.
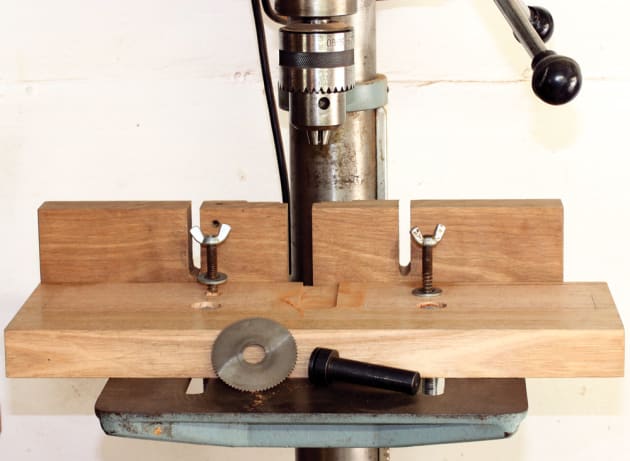
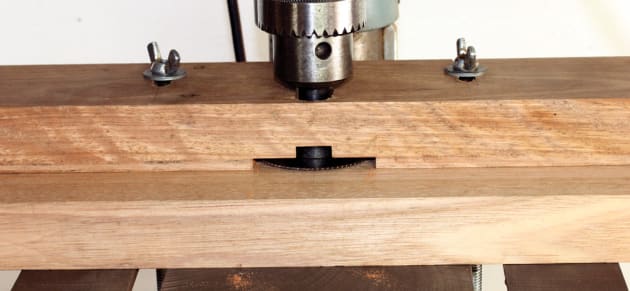
Slotting the bar requires some special gear. My simple slotting jig (photo 6) is made from scrap hardwood, an arbor and a slotting sawblade. The base attaches to the drill-press and the cover for the blade acts as an adjustable fence controlling the depth of cut. You will need a chuck large enough to accept the 5/8" diameter arbor shaft.
Photo 7 shows the jig ready to go. Take time and care to set your jig up very accurately, and cut the full slot gradually in a series of light cuts. By advancing a millimetre or two at a time, with a firm and steady feed rate, you can obtain a very neat and accurate result. Making a push-stick for the brass is a sensible idea, because even though the saw is revolving at a slow speed, it could give a very nasty cut.
The push-stick needs to hold the brass bar very firmly against the base and the guide, or it will chatter and give you a rough slot. If your saw doesn’t quite match the sawplate and the slot is a little loose for the blade, this is easily fixed by lightly clamping the spine in a vice until it is a firm fit. You don’t want an overly-tight or uneven fit, as this may warp the blade. You can also use metal glue like Loctite, but I prefer a ‘pinch-fit’ because it is easier to deal with if problems arise and the spine needs refitting or adjusting.
Making screw holes in the sawplate
The tungsten-carbide tipped builders’ drills that can handle wood and metal will cope with the steel, and are available in suitable sizes. (Note: these bits don’t require cutting fluid when drilling steel—which I discovered by wrecking a brand-new bit...) Even with a hard backing to drill against, the exit side of the hole may distort a bit, but that can be easily rubbed off with a sharpening stone or emery paper.
Saw bolts
Classic old-style bolts with split nuts and a square shoulder under the head to prevent rotation when tightening or un- doing are available from a few suppliers. Making your own costs less for material, and allows you to make sizes suited to different sized saws, but it does take time to make nuts and bolts one at a time.
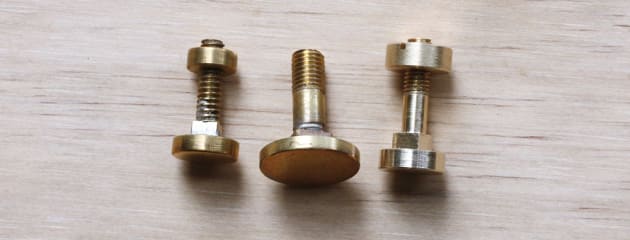
A moderately experienced turner can turn brass on a wood lathe fairly easily by using a slow speed and tools sharpened appropriately, so I started out making bolts by turning a head from brass bar on the wood lathe and attaching that to threaded brass rod, silver-soldered into a few turns of thread in the heads. I ended up with bolts that were acceptable (left in photo 8 above), and certainly did the job, but being threaded along the full shaft is a nuisance because the threads can catch on the saw plate. A neater solution is to use 3/16" brass rod, and thread only part of the shaft, leaving the centre unthreaded (centre photo 8). My recent acquisition of a small metal lathe means I can now simply turn the whole bolt from a length of solid bar, which is a lot easier (right in the same photo). The square part of the shank is made by leaving a small collar, and filing it square using a warding file, or an ordinary file with its edges ground ‘safe’.
Handles
The handle is the part that really personalises your saw in two important ways, one aesthetic, and the other practical. Get the practical aspects right first, and you can then add all the decorative flourishes you wish.
Just about any hardwood will suffice for the job, but I would select one which is fine-grained and tough enough to withstand the occasional accident. A fine-grained wood (apple was a popular species on old saws) that finishes smoothly and remains splinter-free is a good choice.
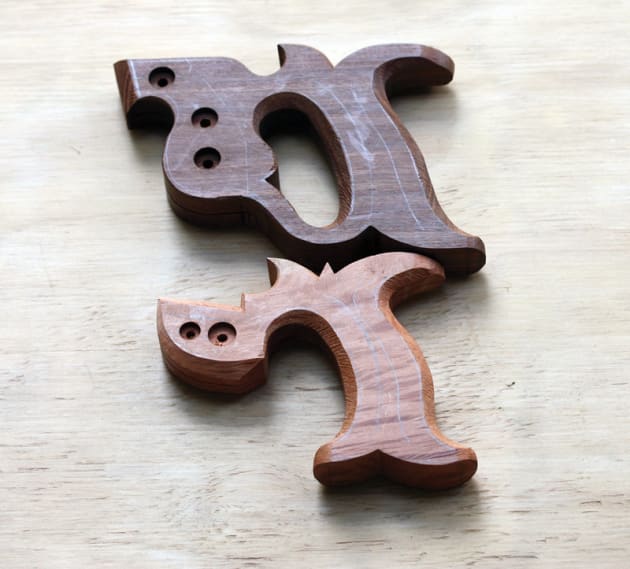
A truly good handle not only fits your hand like a glove, it sets the tooth line of the saw in the best position for sawing. Most handles are designed for the classic three-finger hold, in which you point your index finger along the side of the handle and wrap the other three fingers around the pistol- grip shaped part. Holding a saw like this is widely accepted as the best way, because the set of signals sent to your brain helps it to figure out where the saw is in space. This im- proves your ability to make accurate and repeatable cuts.
Hand sizes vary, so commercial handles are a compromise, but the basic design fits a range of hand sizes with reason- able comfort. However, if your palm is wider or narrower than average, you can extend or shrink the grip a little so it really snuggles into your hand. I’ve found by trial and error that too tight a fit is just as bad as too loose, as it will become quite uncomfortable during a long sawing session.
In particular, don’t make the curve at the bottom that fits under your little finger too tight, and don’t curve the ‘horn’ between thumb and index finger down too much, or it may dig into your hand when sawing at odd angles. For your first handle or two, make a mock-up from scrap to be on the safe side. Once you are satisfied with the critical dimensions, any decorative flourishes will have no bearing on function (within reason) and you can let your imagination run wild if you choose.
Be aware that a few millimetres of difference in the thickness or width of a grip can make a big difference to comfort. If you find a grip you like, follow the dimensions and shape as faithfully as you can. Most old handles are made from 22–25mm thick stock. If your stock is a millimetre or two thinner than the ‘ideal’ handle you are working from, adding roughly the same amount (evenly) to the width of the grip may produce a grip that feels comfortable.
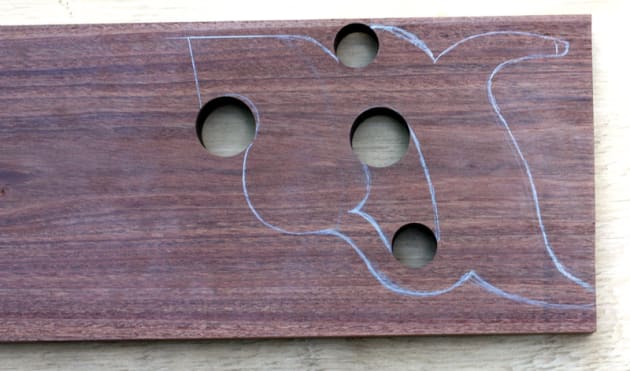
When tracing the handle template onto your wood, pay attention to grain orientation, to get as much ‘long grain’ as possible extending through the weak points (photo 9). The tongue of wood that connects grip to cheeks on a closed handle ends up with short grain. You can compensate for this to some extent by keeping it thick, but shaping the edges to make it appear thinner and more elegant. Some curves can be defined by drilling out the waste, which keeps them neat and square. After cutting out your basic handle shape, it’s a good idea to cut the spine and blade slots and drill bolt holes, because if you mess it up, you haven’t wasted too much time. Take particular care with the blade slot, it needs to be straight and clean, or the blade may warp when the bolts are tightened.
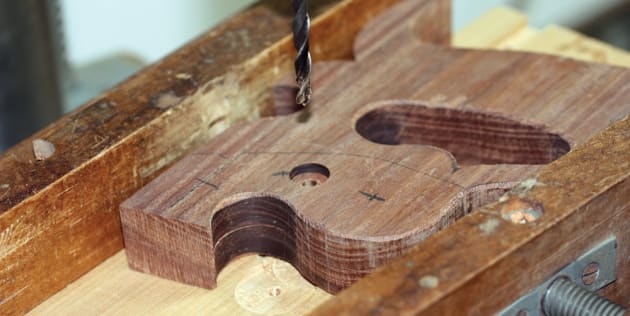
The bolt holes usually have a countersink for both head and nut, and drilling these accurately requires care. I clamp the handle blank in a home-made vice on the drill-press, drill the counter-sink with a Forstner bit, then switch to the bolt- size drill without moving the setup (photo 10). Flip the handle and realign the bolt hole with the drill bit, change back to the countersink bit, and complete the process. If you leave the countersinks a bit shallow, you can adjust them for perfect depth later.
When shaping the handle, guide lines will help maintain the proportions. I ‘finger-gauge’ a series of lines (using my mid- dle finger as if it were the stock of a marking gauge), mark- ing the first set at centre, and then a set at half the distance between edge and centre (photo 11).
The final step is to sand and scrape to your desired level of finish (scraps from the offcuts of your blades make excel- lent small scrapers). I think the nicest lines combine crisp chamfers on the cheeks blended into smooth curves on the parts that will contact your hands, but everyone has their own ideas of what looks best (photo 12).
How you finish the wood is a matter of choice. I like to use Shellawax buffed with a cloth wheel but any finish that doesn’t leave a build-up does the job. Some woods are quite acid and will promote corrosion of the plate inside the handle in moist climates, so I cover the metal with paste wax before inserting it in the handle.
Setting and sharpening of the blade is the last but not least step, and though it takes a bit of practice to do well, is an art well worth acquiring if you are serious about using hand saws. There are books and websites with excellent informa- tion on how to go about it. Your aim is to end up with a saw that cuts quickly and accurately, and follows a line leaving a straight kerf without ragged edges.
With thanks to Ray Gardiner, who not only got me started in sawmaking, but provided much inspiration (as well as material) during my early learning curve. His saw blog (www.backsaw.net) is a great resource for would-be sawmakers or those simply interested in knowing more about saws. Another useful site is: norsewoodsmith.com. Both sites include links to other sites with useful information. A very thorough treatment of saw-sharpening can be found at www.vintagesaws.com My slotting saw and arbor were purchased from McJing’s: www.mcjing.com. au. There are brass suppliers in all capital cities who can supply brass bar in a wide range of sizes. Kits are available from Wenzloff and sons (www. wenzloffandsons.com) in the USA.
Once a veterinary pathologist and academic, Ian Wilkie is a Brisbane woodworker who makes furniture and tools. He has written several stories for Australian Wood Review magazine.


